Wednesday, December 13, 2017

Peanut ladoo recipe / how to make peanut ladoo / peanut ladoo recipe with images and video

Peanut Ladoo Recipe
Peanut Ladoo 

A very simple and easy three ingredient recipe of scrumptious and full of proteins ladoo which involves just the roasting of peanuts and then grinding it to coarse mixture with jaggery powder.

Care has to be taken while roasting the peanuts. Roast them on low flame and roast them till they turn brown and their raw taste and smell goes away. They should turn crunchy.


Ingredients:

1cup Peanuts

¾ cup Jaggery

2 tbsp Ghee

Method:

Firstly heat a pan and dry roast the peanuts. Do this on low flame and roast them till they turn brown and their raw taste and smell goes away. They should turn crunchy and give a nutty flavor.


Let them cool a bit. Rub them in between your palms and remove their peel.

Now in a grinder jar take these dry roasted and peeled peanuts along with the ¾ cup jaggery powder and grind them to a coarse mixture.

Peanut Ladoo Recipe
take peanuts anf jaggery in jar

Peanut Ladoo Recipe
coarsely grind


Transfer it to a bowl and add 2 tbsp of ghee in it.

Peanut Ladoo Recipe
add ghee


Mix it well. The mixture should be such that if you press a small portion of it in your hand the mixture should be able to hold its shape and should not fall apart.

Peanut Ladoo Recipe
should hold shape


If the mixture is not holding its shape you would need to add in some ghee. For me the said quantity was enough.

Now grease your hands with a little ghee and start making ladoos.

Peanut Ladoo Recipe
grease hands


Take small portion and give them a shape of ladoo. Likewise make ladoos for the entire mixture. It would yield around 10 to 12 ladoos.

make ladoos


I made 12 ladoos of the mixture.

Store it in an air tight container and it would stay good for a week at normal room temperature.


Peanut Ladoo Recipe
Peanut Ladoo 


Tips:

Roast peanuts on low flame and roast them till they turn brown and their raw taste and smell goes away.

If the mixture is not holding its shape you would need to add in some ghee.

You can also add in some dry fruits as per your choice.

Shelf life is a week if stored in air tight container.


Do try this food-a-licious peanut ladoo and write in your suggestions via comments.


Monday, December 11, 2017

Vegetable cutlet recipe / how to make veg cutlet / vegetable cutlet step by step images / video recipe


A perfect snack made of boiled and mashed potatoes mixed with some veggies and spices and then deep fried to get that crispy feeling outside and soft inside and is temptingly mouth-watering when served with green chutney.

This again is my mom’s recipe. I have been having this since childhood. Muma also used to give it to me in my tiffin as it serves a great tiffin snack.

Now this recipe does not call for adding any corn flour or all purpose flour for binding. You just have to add some fresh bread crumbs to the mixture and its all set for frying. If you feel that the mixture is still loose add in some more bread crumbs. However for me the said quantity was enough.

Also there is no need for coating. So it’s a very simple and easy recipe.

Do give it a try and let me know your experience via comments.

Also if you are looking for some other snack recipes do visit Also have a look at the other snack recipes on my blog punjabi namkeen mathrimumbai street style sandwichstuffed papad conesveg schezwan frittersbread masalabread rollspotato seekh kebabhash brown mini pizza,hash browns. For the recipe videos please visit my You Tube Channel and do subscribe it.


For more such recipes plz subscribe my channel


Ingredients:

2 potatoes (boiled and peeled)

¼ cup Green peas (boiled)

1 Carrot (boiled)

¼ cup Bread crumbs (fresh)

1 Onion (finely chopped)

1 tbsp Coriander (chopped)

1 Green Chilli (finely chopped)

1 tsp Sugar

1 tbsp Lemon juice

1 tsp Garam Masala powder

½ tsp Red Chilli powder

Oil for frying

Method:

Take a mixing bowl.


In it add the above ingredients except oil. Give it a mix.

Vegetable cutlet recipe
add all the ingredients


Mash and combine. If you feel that the mixture is still loose add in some more bread crumbs. However for me the said quantity was enough. This is the time when you can check and adjust salt and spices.

Vegetable cutlet recipe
Mash

Vegetable cutlet recipe
combine

 
Take a heart shaped mould and grease it with oil.

Vegetable cutlet recipe
grease the mould


Take a small portion of mixture and fill the mould with the mixture.

Vegetable cutlet recipe
fill the mould with mixture


Press it gently.

Vegetable cutlet recipe
press gently


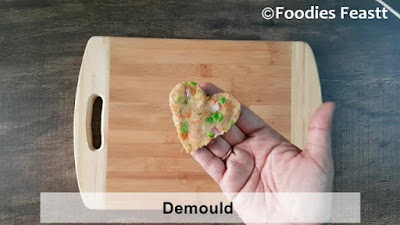
De mould it to get the heart shaped cutlet. However you can use any shape of mould as per your liking. Or even you can give it a round or oval shape with your hands.

Vegetable cutlet recipe
Demould


Slide the cutlets into hot oil. Do not overcrowd the pan. Fry on medium heat and not on high heat to avoid burning.

Vegetable cutlet recipe
slide into hot oil

Vegetable cutlet recipe
fry on medium heat


Flip and fry from both sides until golden and crisp.

Vegetable cutlet recipe
flip and fry
Vegetable cutlet recipe
golden and crisp


Drain on a kitchen tissue to remove excess oil.

Vegetable cutlet recipe
Drain on kitchen tissue


Serve them hot with green mint chutney or coriander chutney. Also you can pack them for kids in their tiffin.

Vegetable cutlet recipe


Tips:

If you feel that the mixture is still loose add in some more bread crumbs.

Fry on medium heat and not on high heat to avoid burning.

Vegetables can be added as per your choice and requirement.


Do try this food-a-licious recipe and share your experience with us via comments.

Wednesday, December 6, 2017

Amritsari khatte chole recipe / punjabi chole recipe / amritsari chole step by step images / punjabi chole recipe video

Amritsari Khatte Chole


As the name suggests my today’s recipe is a north Indian dish right from Amritsar. The authentic amritsari chole recipe which is a very popular street food of amritsar having the tangy flavor of tamarind and most importantly is cooked without oil. Yes, you read it right, it’s a zero oil recipe. Very light and full of flavors.

I have learnt this recipe from my mother in law. As she is born and raised in Amritsar, she is a master in every bit of amritsari food recipes.

Firstly the chickpeas also known as kabuli chana are soaked overnight in sufficient water.
Then are boiled and later flavored with some typical north Indian spices.

Also have a look at the other north Indian recipes on my website stuffed capsicum Punjabi style, Punjabi suran masala, Punjabi dum aloo restaurant style, stuffed brinjal,

Ingredients:

1 cup Chickpeas

3 ½ cups Water

1 Onion (finely chopped)

1 inch Ginger (sliced)

¼ cup Tamarind pulp

2 Green Chillies (cut into half)

1 tsp Red Chilli powder

1 tsp Garam Masala powder

1 tbsp Kasuri Methi

1 tsp Cumin seeds (dry roasted and crushed)

1 tbsp Coriander (chopped)

Salt


Method:

Firstly take 1 cup of chickpeas wash them and soak them in enough water overnight.  Add enough water as the chickpeas would increase in size after being soaked.

Take tamarind as per your taste and soak it in ¼ th cup of water. By the time the chickpeas would be cooked the tamarind would also be soaked.

Take a cooker, turn on the heat and add the soaked chickpeas in to it followed by 3 ½ cups water, 1 inch ginger sliced and salt as per your taste. Mix well.

Amritsari Khatte Chole
add chickpeas, ginger, salt


Bring it to boil.

Amritsari Khatte Chole
boil


Then close the lid of the cooker and let it pressure cook for 20 minutes on low heat.
In the meanwhile dry roast cumin seeds and crush them. I always use freshly roasted cumin seeds as they add immense flavor to the dish.


Amritsari Khatte Chole
pressure cook for 20 min

Also, by this time the tamarind would be ready for making pulp. Just mash it with your hands and the tamarind would release all its pulp.

Let the pressure release by itself and then open the cooker. The chickpeas would be cooked by now.

Amritsari Khatte Chole
open the cooker


Next step is to add the tamarind pulp and green chillies. Let it simmer for about 5 minutes so that the tamarind pulp gets completely incorporated with the chickpeas.

Amritsari Khatte Chole
add tamarind pulp and green chillies

 
Amritsari Khatte Chole
simmer 5 min
After 5 minutes add in 1 tsp red chilli powder, 1 tsp garam masala powder, 1 tbsp Kasuri methi, 1 onion chopped and mix well.

add red chilli pwd, garam masala pwd, kasuri methi, onion


Now put in the freshly roasted and crushed cumin seeds and chopped coriander leaves. Give it a final mix.

Amritsari Khatte Chole
add cumin, coriander and mix


The amritsari khatte chole are ready.

Amritsari Khatte Chole
Amritsari Khatte Chole are ready


Serve them hot with puris, kulcha, naan, roti or even plain steamed rice.

Amritsari Khatte Chole
Amritsari Khatte Chole 


Tips:

Use freshly dry roasted and crushed cumin seeds.

Add tamarind pulp as per your taste and requirement.


Do try this food-a-licious amritsari khatte chole and let us know your experience via comments

Tuesday, December 5, 2017

Fresh coconut burfi recipe / easy nariyal burfi recipe / how to make fresh coconut burfi / coconut burfi step by step images / coconut burfi recipe video

Fresh Coconut Burfi Recipe – Easy Nariyal Burfi Recipe
Fresh Coconut Burfi Recipe 

There are many ways to make coconut burfi some are made using condensed while others have no milk no condensed milk. My today’s recipe of  coconut burfi has milk included.

A very tasty and full of flavor coconut dessert that is easy to make with just three main ingredients coconut, milk and sugar. Then to add in some flavor I have put in cardamom powder and to garnish I have sprinkled some sliced pistachios and almonds.

It can also be called a 3 ingredient burfi as cardamom powder and dry fruits could be skipped.

Also have a look on the other burfi recipes on my website maida burfi, milk powder burfi (10 mins burfi), instant kalakand recipe


Ingredients:

2 cups Coconut (fresh and grated)

1 ½ cups Sugar

1 Cup Milk

½  tsp Cardamom powder

10 Almonds (sliced for garnishing)

10 Pistachios (sliced for garnishing)

Method:

Take a pan.


Heat 2 tbsp of ghee.

Fresh Coconut Burfi Recipe – Easy Nariyal Burfi Recipe
heat ghee


Then add 2 cups Coconut (fresh and grated), 1 ½ cups Sugar and 1 Cup Milk.

Fresh Coconut Burfi Recipe – Easy Nariyal Burfi Recipe
add coconut, milk and sugar


Mix well and cook on medium heat. The entire process should be carried out on medium heat else the coconut would get burnt.

Fresh Coconut Burfi Recipe – Easy Nariyal Burfi Recipe
mix well


The sugar would start to melt and mixture. It takes around 2 to 3 minutes. Keep on stirring. Then the bubbles start to appear.

Fresh Coconut Burfi Recipe – Easy Nariyal Burfi Recipe
sugar melts


After a while mixture would begin to thicken and the bubbles would reduce slowly.


Fresh Coconut Burfi Recipe – Easy Nariyal Burfi Recipe
medium heat

Fresh Coconut Burfi Recipe – Easy Nariyal Burfi Recipe
mixture thickens

Now add in the ½ tsp of cardamom powder and mix well.

Fresh Coconut Burfi Recipe – Easy Nariyal Burfi Recipe
add cardamom powder


Keep stirring till the mixture leaves the sides of the pan. It takes around 8 to 10 minutes. Do not over cook. Overcooking would harden the burfi.

leaves sides of the pan


Transfer it on to the butter paper and level it with a greased spoon or spatula. Greased spoon or spatula is required so that the mixture would not stick to the spoon or the spatula.

Fresh Coconut Burfi Recipe – Easy Nariyal Burfi Recipe
transfer on to butter paper

Fresh Coconut Burfi Recipe – Easy Nariyal Burfi Recipe
level with greased spatula


Sprinkle on the sliced almonds and pistachios. Press them gently so that the they get stuck with the mixture.

Fresh Coconut Burfi Recipe – Easy Nariyal Burfi Recipe
sprinkle almonds and pistachios
Fresh Coconut Burfi Recipe – Easy Nariyal Burfi Recipe
press gently


Cut into squares or your desired shape when it is still hot. Else later on after cooling it would be difficult to cut the pieces.

Fresh Coconut Burfi Recipe – Easy Nariyal Burfi Recipe
cut into squares


Cool completely and serve.

Fresh Coconut Burfi Recipe – Easy Nariyal Burfi Recipe
cool comlpletely


It remains good for a week if stored in an airtight container.

Fresh Coconut Burfi Recipe – Easy Nariyal Burfi Recipe


Tips:

The entire process should be carried out on medium heat to avoid burning of the mixture.

Continuous stirring should be done again to avoid burning of the mixture.


Use dry fruits of your choice for garnishing.


Try this food-a-licious fresh coconut burfi and share your experience with us via comments