Wednesday, April 12, 2017

Its a very easy recipe with just 4 ingredients and would be ready in a couple of steps. Chocolate sauce is loved by everyone irrespective of their age and gender. Chocolate sauce can be used for making chocolate milkshakes, decoration of cakes, pastries or can be drizzled on the ice creams to add in some extra chocolaty flavor. I love it best when layered on brownies. It can also be added to the milk for kids.. they would just love this and would never again say no for milk.
Chocolate Sauce Recipe

Try out this recipe and you will never purchase it from the market again. Lets begin with this very easy recipe of Chocolate sauce, first with the ingredients.

Ingredients:

1 Cup Cocoa Powder

2 Cup Powdered Sugar

1/4 tsp Salt

1 1/2 Cup Water

1 Tbsp Vanilla Essence


Method:

In a bowl take cocoa powder.


Chocolate Sauce Recipe
take cocoa powder in a bowl


Then add in sugar, salt and mix well.


Chocolate Sauce Recipe
add in sugar, salt and mix well


Then add water in parts and mix well. Heat this mixture in a pan till the sugar dissolves completely. It would take about 2 to 3 minutes.


Chocolate Sauce Recipe
add water and heat


Turn off the gas. Let the sauce cool and then add the vanilla essence. Mix it well and your home made chocolate sauce is ready to be used.Store it in an air tight container. The color difference seen in the sauce of the pan and the final product is because after heating the sugar gets dissolved and you will get that glossy shiny finish chocolate sauce.

Chocolate Sauce Recipe


Tips:

Use unsweetened cocoa powder as it gives that deep chocolate color.

Water can be adjusted as the consistency required.

Sugar should b dissolved completely


So foodies...make your desserts more delicious by adding this home made chocolate sauce. This summer do try this and make some exciting milkshakes using this chocolate sauce and do not forget to share your experiences and suggestions with me via comments.  

If you like my recipe then plz like, share and subscribe..

Friday, April 7, 2017

My previous recipe was about making Hash Browns in a very easy and a simple manner. Hash browns is one such recipe which is very easy to make and you could top it with variety of toppings. 


Hash Brown Mini Pizza Recipe
Hash Brown Mini Pizza 


I have tried the hash browns with pizza toppings and hence I have named it Hash Brown Mini Pizza.

You can make it for your brunch, your house parties or even for the kids birthday parties. I made it for my house party and it became the highlight of the day.

For making these hash brown mini pizza, you need to make the hash browns really crisp and it should be a thin layer. So while making the hash browns take a small portion of the grated potatoes and spread them to form a thin layer.

You can even sprinkle the potatoes directly on to the pan instead of shaping it on your hands. It has to be a thin layer of crisp hash browns with corns, capsicum, onion, black olives all mixed in the delicious pizza sauce and then topped with lots of cheese. Wowww..now this would be one such dish you could not end up having just one.

So, let us have a look on how to make this hash brown mini pizza.

Servings: 4 Hash Brown Mini Pizza

Ingredients: 

For hash browns:

4 medium sized Potatoes

1 Tbsp Butter

Salt and Pepper to Taste

For Topping:

1/4 cup boiled sweet corn kernels

1 small Onion (finely chopped)

1 small Green Capsicum (finely chopped)

8 to 10 Black Olives (sliced)

2 Tbsp Pizza Sauce

4 Cheese Slices


Method:

We would first prepare the topping by mixing the corn, onion, green capsicum in pizza sauce and keep it aside.


Hash Brown Mini Pizza Recipe
Make the topping mix


Peel the potatoes and wash them. Pat dry them with a kitchen towel.

Grate them with a grater. Squeeze out the water from the potatoes by pressing them with your hands.

Now, add salt and pepper to taste. Remember we are using salted butter for frying so add in salt accordingly.

Heat butter in a pan. Take a small portion of the grated potatoes and give it a round shape. You can also apply oil to your hands before shaping the grated potatoes. The hash browns should form a thin layer. Put it in the pan and press it gently with a spatula. Let it cook on medium flame. It will take time as the potatoes are non starchy. And hence would be crisp.

Flip it once the bottom has turned nice golden brown.
Spread the topping that we have mixed with pizza sauce on the hash browns. 


Hash Brown Mini Pizza Recipe
Spread the topping on hash brown


Then place the black olives on the top.


Hash Brown Mini Pizza Recipe
Place the black olives


And finally put the cheese. 


Hash Brown Mini Pizza Recipe
Put cheese on top and cover it

Cover the hash brown so that the cheese would melt and by the time the other side of the hash would also be cooked to nice golden brown and crisp. And your hash brown mini pizza's are ready.


Hash Brown Mini Pizza Recipe
Hash Brown Mini Pizza 


Enjoy it with tea as a snack or make it for your kids, it would be everyone's delight. 

Tips:

The Hash brown should be thin and crisp.

You can also sprinkle some herbs of your choice on the hash brown mini pizza just before serving.

If you want it spicy add in some red chilli flakes.


So go food-a-licious with this very unique recipe of Hash Brown Mini Pizza's and let me know your experiences and suggestions via comments.

If you liked my recipe of these Hash Brown Mini Pizza, then please like and share my page.


Thursday, April 6, 2017

Its a very simple recipe to make hash browns which are very crisp on the outside and soft inside. Firstly, let us know what exactly hash brown refers to. According to wikipedia, Hash browns are a simple preparation in which potatoes are pan-fried after being shredded, diced, julienned or riced. Hash browns are the staple breakfast food in North America and the UK. In some countries Hash Browns are made with fully cooked potatoes, whereas in others they are parboiled or even used raw. 


How to make Hash Browns
Hash Brown 


I always like to keep my recipe simple and easy, so, I make these hash browns using raw potatoes. For making the hash browns, all you need are potatoes. Yes, but the potatoes have to be non starchy. Now, how would you know that the potatoes are non starchy. The non starchy potatoes are the ones with a thin skin. Do not go for the old potatoes as they have more starch in them. Also, the non starchy potatoes can hold their shape whereas the others cannot, so it is important that you use the non starchy potatoes.

Now, lets begin with the recipe, and first the ingredients.

Ingredients:

4 medium sized Potatoes

1 Tbsp Butter

Salt and Pepper to Taste


Method:

Peel the potatoes and wash them. Pat dry them with a kitchen towel.

Grate them with a grater. Squeeze out the water from the potatoes by pressing them with your hands.

Now, add salt and pepper to taste. Remember we are using salted butter for frying so add in salt accordingly.

Heat butter in a pan. Take a small portion of the grated potatoes and give it the shape you want, I prefer round, so I have made it round. You can also apply oil to your hands before shaping the grated potatoes. Put it in the pan and press it gently with a spatula. Let it cook on medium flame. It will take time as the potatoes are non starchy. And hence would be crisp on the outer surface.

Flip it once the bottom has turned nice golden brown. And similarly cook the other side. And your hash browns are ready.


How to make Hash Browns
Hash Browns


You can make it for your breakfast or even pack it in the tiffin for kids. It goes best with omelette and tomato ketchup. 


Tips:

Cook it on medium flame. As the high flame would turn your hash browns black.

Squeeze out the water completely. As the water would not let the hash brown strands to be intact and hence will not retain its shape and would break.

If you are using salted butter for frying add less salt in the potato mix.


So for a change forget your paranthas, idlis and pohas for breakfast and try out these very yummy crisp hash browns and let me know your experience and suggestions via comments.

Wednesday, March 22, 2017

 I always find some unique ways to present my dish. As I believe that a good presentation can make a very simple dish look amazing and outstanding. My today's recipe is based on the same belief. The Custard And Jelly, its a very simple dessert made and loved by almost everyone. One can make it healthier by adding in some mixed fruits.


Custard Jelly Recipe

A very easy recipe with a unique presentation.  If you are using unflavored custard then add in some vanilla essence. Lets begin with the recipe starting with the ingredients

Ingredients:

1/2 litre Milk

2 tbsp  Custard Powder

2 tbsp Sugar

Jelly one packet 90 gms

1/2 cup chopped mixed fruits

Method:

Firstly make half the packet of jelly as mentioned on its box. Pour in the dessert bowls to form a layer as shown in the pic below. Keep it at room temperature to set.


Custard Jelly Recipe
Form a jelly layer


Take custard powder in a bowl and mix some milk in it. Mix it well. No lumps should be left. Heat the remaining milk in a pan, add sugar and bring it to boil. 


Custard Jelly Recipe
Boil milk and add sugar


Once boiled add in the custard powder mix while stirring continuously. Boil it for two more minutes and turn off the gas.


Custard Jelly Recipe
Add custard mix 

Keep it stirring else a layer would be formed on the custard. Keep in the the fridge to chill.


Once chilled (after an hour) mix in the chopped mixed fruits.


Add in the chopped mixed fruits

By this time the jelly in the dessert bowl would be set. Now put in the custard with mixed fruits with the help of a spoon. Fill the glass leaving some space for the last jelly layer.


Form second layer of custard

Then again make the jelly as per the instructions given and pour it on the custard layer to form the final layer. Again keep it at room temperature for the jelly to set. 


Custard Jelly Recipe
Form third layer of jelly


Top it with fresh cream and grapes. Refrigerate it and serve chilled.


Custard Jelly Recipe


Tips:

Do not keep the custard at room temperature for long as it would form a layer on the top.

Pour the custard with the spoon to avoid making the dessert bowl dirty.

Also while pouring the top jelly layer, pour it carefully and slowly with a spoon or it might get mixed with the custard.


The three colorful layers and its topping makes it mesmerizing and so tempting that no one could resist having it.

Its fun making it and when you have its first spoon, the blast of all the different flavors of fruits, jelly and custard would make you go food-a-licious.

At the last, as I always say try it for your loved ones and write in your experiences and suggestions to me via comments.

If you loved my recipe of this unique presentation of custard and jelly, then plz like, share and subscribe.


Tuesday, March 21, 2017

This recipe is loaded with lots of nutrients, taste, sweetness and look wise its just mouthwatering, a ten on ten recipe. It will definitely make you go food-a-licious this summer season. 


Mixed Fruit Ice Cream Falooda


While making this Mixed Fruit Falooda, you need not be perfect in the measurements of the ingredients. It all depends on your own taste. Like if you want it to be less sweet, cut down the sugar. Add in the fruits and nuts which go well with your taste. I have used the raspberry jelly and the vanilla ice cream, you can use whichever you like. 

The quantity of the ingredients I have mentioned in the list would serve for 2. It also depends on the size of your glass.

I have used Weikfield Rasberry Jelly and set it as per the instructions given on it. Make the falooda noodles as mentioned on the packet.

Ingredients:

2 Cups Milk

1/4 cup rose syrup

1/4 cup Chopped Mixed Fruits (black and green grapes, pomegranate, kiwi)

1/4 cup Chopped Dry Fruits ( raisins, cashewnuts, pistachios, almonds, walnut)

1/2 cup Jelly cubes

1/2 cup Falooda Noodles (cornflour vermicelli)

4 scoops Vanilla Ice Cream

1/4 cup Basil Seeds (Sabja seeds) soaked


Method:

Firstly boil milk in a pan and reduce it to half.

Then add sugar in it. Keep it in the refrigerator to cool. Then add rose syrup in it and mix it well to get the beautiful pink color. Keep it aside.

In a glass first put a layer of jelly cubes and add some rose syrup to it.

Then add some falooda noodles to it followed by a layer of mixed fruits.

Next would be the basil (sabja) seeds and again some noodles on it.


Mixed Fruit Ice Cream Falooda


Add a little milk with rose syrup, it should reach to the bottom of the glass but do not fill the whole glass.

Then add a scoop of Ice cream to it followed by some more milk.

Then one more scoop of ice cream. And top this ice cream scoop with some chopped dry fruits, jelly and pomegranate seeds.

And here your Mixed Fruit Falooda Ice Cream is ready to be enjoyed in this hot weather.


Mixed Fruit Ice Cream Falooda


Tips:

Keep the glass in the refrigerator to chill before starting with the recipe.

If you want it to be less sweet do not add sugar in milk. The rose syrup itself would make the milk a bit sweet.

Make this delicious recipe of Mixed Fruit Falooda and enjoy it with your family, loved ones and specially your kids. And do not forget to write in your suggestions and experiences via comments.


And if you like this recipe of Mixed Fruit Falooda Ice Cream, then plz like, share and subscribe..Thank U...


Friday, March 17, 2017

Matar Paneer is the most common dish of North India made by almost all the North Indian families. The color combination of the green peas and paneer in onion and tomato gravy itself is a visual treat and the softness and richness of paneer makes the dish worth trying.


Matar Paneer Recipe
Matar Paneer Recipe

I make matar paneer very often. I like to keep it simple and light, but if one wants to make it more rich then add in the cashewnut paste along with the tomato paste.

So let us begin with the ingredients 

Ingredients:

1/2 kg Green Peas

200 gms Paneer (cottage cheese cubes)

1/4 Cup Oil

1/4 tsp Ginger (paste)

1/4 tsp Garlic (paste)

1/4 cup onion (paste)

1/4 cup Tomato (paste)

1/4 tsp Jeera (Cumin Seeds)

1/4 tsp Turmeric powder

1 tbsp Kashmiri Red Chilli Powder

1/4 tsp Punjabi Garam Masala powder

1/4 tsp Coriander powder

1 tbsp Coriander leaves (finely chopped)

Salt to taste

Method:


Heat oil in a pan. Fry the paneer (cottage cheese) cubes till the edges turn golden brown. Keep them aside.


Matar Paneer Recipe
Fry paneer 


In the same oil add jeera.


Matar Paneer Recipe
Add Jeera


When Jeera starts releasing its aroma add in onion, ginger and garlic paste. 


Matar Paneer Recipe
Add onion, ginger,garlic paste


Mix it  well. Cook it till the paste turns into beautiful golden brown color. Now add salt, red chilli powder, turmeric powder and mix well. 


Matar Paneer Recipe
Add salt, turmeric and red chilli pwd


Cook it for a minute and then add the tomato paste. Mix well and cook for another 5 minutes or until the tomato paste is properly incorporated into the masala.


Add tomato paste

Then put the punjabi garam masala and coriander powder and mix well. 


Matar Paneer Recipe
Add punjabi garam masala and coriander powder


Then add in some water as per the required consistency. Simmer it on medium flame till the gravy is properly cooked. It would take around 5 to 7 minutes. 


Matar Paneer Recipe
Add water and cook


Then add the green peas and paneer (cottage cheese) cubes and mix well.


Add paneer and green peas


Now finally put in the chopped coriander.


Matar Paneer Recipe
Add chopped coriander

Serve it hot with Roti, Naan, Rice or pulao. Well, I like it with plain steamed rice. 


Matar Paneer Recipe
Matar Paneer Recipe


Tips:


Cook the masala on low to medium flame till the masala leaves oil and does not stick to your pan.

Use fresh paneer to get the desired taste.

Do not add more of Punjabi Garam Masala as it would spoil the taste.

To make it more spicy add some green chillies along with onion while making its paste.

You can add more water if more gravy is needed.


Make this delicious and healthy matar paneer for lunch or dinner and enjoy it with your family and loved ones.

Go food-a-licious with this matar paneer recipe and share your experiences and suggestions with me via comments.


Tuesday, March 14, 2017

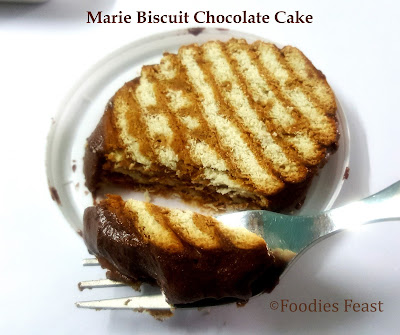
Now, this cake is one such recipe that even the kids can try their hands on. It is made using very simple ingredients that are available in everyone's kitchen. I used to enjoy making and having it along with my younger brother when we were in school. We used to make two of these one only for him and me.. and the other for the rest of the family lol..


Marie Biscuit Chocolate Cake

Okay, so let us just know a bit about the ingredients. Firstly, yes, the biscuits ofcourse. Then we have the sugar, we need sugar for the icing. Icing sugar is always preferred but not to worry, you can use the simple powdered sugar. If you don't even have that, then, grind the granulated sugar and powder it. Next comes cocoa powder, if you dont have the cocoa powder, then keep the icing white or add in some color if available, Kids are gonna love it with any essence. 

Then comes in the fresh cream, again, if you dont have it, relax, take some unsalted butter. I have used home made white butter. So, lets begin with the recipe and first the ingredients..

Ingredients:

30 Marie Biscuits

1 cup Water

2 tbsp Coffee powder

1/2 cup Home made White Butter

1 Cup Icing Sugar

1/4 cup  Cocoa Powder

2 to 3 drops Vanilla Essence


Method:

Firstly we will prepare the icing as it needs to rest in the fridge for 30 mins before applying.

So take the white butter in a bowl. The butter should be at room temperature. 


Marie Biscuit Chocolate Cake
Take butter


Now add in the sieved sugar and cocoa powder. 


Marie Biscuit Chocolate Cake
Add sieved cocoa powder and sugar


Mix well till it becomes light and fluffy. And till the sugar is completely dissolved.


Marie Biscuit Chocolate Cake
Mix well


Keep it in the fridge for about 30 mins. 

Now, in a dish mix well coffee powder in a cup of water.


Marie Biscuit Chocolate Cake
Mix coffee powder in water


Then dip one biscuit in it and place it on a plate with aluminium foil on it. 


Dip biscuit and place it on a plate


Then, dip the second biscuit in coffee water and place it on the first one.


Marie Biscuit Chocolate Cake
Dip the second biscuit


Do the same for all the 30 biscuit and make a tower.


Marie Biscuit Chocolate Cake
Do same for all the biscuits


Now, take the icing and apply all over the biscuit tower. No need for professional finishing of icing. Keep it messy, it looks good. Keep it in the freezer for an hour to make the icing firm.


Marie Biscuit Chocolate Cake
Apply Icing


Then after an hour when the icing is firm enough to handle, keep the biscuit tower in horizontal position so that the icing could be applied to the base.


Marie Biscuit Chocolate Cake
Apply icing to base


After applying the icing to the base again keep it in the fridge for the icing to set.

Then cut the biscuit cake into slices by cutting with the knife at 30 degrees as shown in the picture below.  


Marie Biscuit Chocolate Cake
Slice the biscuit cake


And your yummy delicious marie biscuit cake is ready.


Marie Biscuit Chocolate Cake


Tips:


The consistency of the icing should not be very runny else it will not set.

Do not leave the biscuit in coffee water for long else the biscuit would become very soft and get dissolved.

To get the desired consistency of icing if needed add some milk.


Go Food-a-licious with this very easy to make instant Marie Biscuit Cake with your loved ones and specially with your kids.


Marie Biscuit Chocolate Cake


Enjoy it and do not forget to share your experiences and suggestions with me via comments.