Tuesday, August 22, 2017

Dal Paratha Recipe / Paratha with Leftover Dal / Dal paratha with step by step photos.

Dal Paratha Recipe / Paratha with Leftover Dal 

 
My today’s recipe is of Dal Paratha. There are various types of dal parathas which can be made. Some are made by stuffing the dal and like this one the dal is kneaded in the dough and then the parathas are rolled out.

Whenever we make dal, some of it is always left. Now what to do with this dal. So here comes a very interesting recipe where you can use your leftover dal and make a delicious meal out of it.

Dal is included in my everyday meal so whichever dal is made, the leftover can be used to make its parathas. All you need to do is add in some spices, wheat flour, knead a dough and make parathas of it.

Today I have used maa chole ki dal as called in Punjabi. Its also known as kali dal but you can also use moong dal, masoor dal, moong masoor mix, or any that is available.

For better understanding please watch the video given.

If you are looking for paratha recipes then plz do visit Mooli Paratha, Methi Paratha, Onion Paratha, Aloo Paratha, Gobi Paratha


Ingredients:

1 cup Dal

1 cup Wheat Flour

1 small Onion (finely chopped)

2 tbsp Coriander (finely chopped)

2 Green Chillies (finely chopped)

1 tsp Garam Masala powder

½ tsp Red Chilli Powder

½ tsp Carom Seeds (ajwain)

Salt to taste

2 tsp Ghee

Ghee for Frying

Method:

In a bowl take dal, add in the onion, green chilli, coriander, salt, red chilli powder, garam masala powder, carom seeds, flour.

take all ingredients in a bowl


Mix it well. 


This is the time when you can check and adjust the salt and spices, as once the dough is kneaded that it won’t b possible.
 
Dal Paratha Recipe / Paratha with Leftover Dal
mix well, check and adjust salt and spices
Knead it into a dough.

Dal Paratha Recipe / Paratha with Leftover Dal
knead into a dough


Heat a skillet (tawa) on medium flame.

Take one ball, apply some flour and flatten it.

Dal Paratha Recipe / Paratha with Leftover Dal
take a small portion and make a ball
Dal Paratha Recipe / Paratha with Leftover Dal
flatten


Roll it into a circle and apply ghee on it.

Dal Paratha Recipe / Paratha with Leftover Dal
roll it into circle 
Dal Paratha Recipe / Paratha with Leftover Dal
apply ghee


Fold the opposite sides and overlap them.

fold opposite sides and overlap


Now fold the other two sides and form a square.
 
Dal Paratha Recipe / Paratha with Leftover Dal
fold the other two sides and form a square
Roll it maintaining the square shape.

Dal Paratha Recipe / Paratha with Leftover Dal
roll


Now the skillet would be hot enough so place the paratha on it.
 
Dal Paratha Recipe / Paratha with Leftover Dal
place paratha on tawa

Cook on medium heat. When bubbles appear on the paratha flip it.

Dal Paratha Recipe / Paratha with Leftover Dal


Apply ghee on it and flip it.

Dal Paratha Recipe / Paratha with Leftover Dal
apply ghee and flip


Flip it, apply ghee and cook the other side till brown.

flip and apply ghee
Now press gently with a spatula and cook till the both sides becomes brown and evenly cooked

Dal Paratha Recipe / Paratha with Leftover Dal
gently press with spatula

Dal Paratha Recipe / Paratha with Leftover Dal
evenly cooked and brown on both sides

 
Top it with home made white butter and Serve hot with curd for
breakfast.

Dal Paratha Recipe / Paratha with Leftover Dal
Dal Paratha Recipe / Paratha with Leftover Dal 


Tips:

Cook on medium heat.

Do not forget to add carom seeds (ajwain) as it helps in digestion.

Taste and adjust the salt and spices before kneading the dough.


Make this dal paratha with left over dal and let us know your experiences via comments

Thursday, August 17, 2017

Jaggery Halwa Recipe / How to make jaggery sooji halwa / gur rava sheera. Jaggery halwa recipe with step by step photos and recipe video.

Jaggery Halwa
Jaggery Halwa

 
Jaggery halwa is a sweet Indian dish containing of semolina (sooji)with some dried fruits and jaggery for sweetness.

Whenever I am in a rush, I go for this jaggery halwa. As it is less time consuming and delicious to the core.

The key element in making this jaggery halwa is the jaggery and ofcourse roasting of semolina. The roasting should be appropriate, as over roasting and less roasting both would deteriorate the taste of the halwa.

Have a look at the recipe video better understanding of the recipe.


Ingredients:

½ cup Semolina

½ cup Jaggery powder

¼ cup Ghee

1 cup Water

10 to 12 Cashew nuts (halved)

2 tbsp Almonds (sliced)

Method:

Take water in a pan and add jaggery powder to it. 


Stir it on medium heat till the jaggery powder gets completely dissolved. Keep it aside.

Jaggery Halwa
water and jaggery

Jaggery Halwa
jaggery dissolved


In another pan heat ghee and add semolina (sooji) to it.

Jaggery Halwa
heat ghee

Jaggery Halwa
add semolina


Start roasting it on low to medium it. Keep stirring continuously as the semolina (sooji) should not stick to the pan.

Jaggery Halwa
start roasting


Roast it till the semolina (sooji) turns light golden in color. Do not roast more, the semolina (sooji) should not turn brown, else you would end up burning the semolina (sooji).

Jaggery Halwa
semolina turns light golden


Now add in the jaggery water slowly, be careful while adding the water as the mixture would sputter.

Jaggery Halwa
add jaggery water


Next put in the dry fruits.

Jaggery Halwa
add dry fruits


Mix well by stirring continuously. The semolina would start absorbing water and the mixture would gradually become thick.
 
Jaggery Halwa
absorbs water

Jaggery Halwa
becomes thick

Keep on stirring continuously.

The final consistency and texture should be as shown in the below photo.

Jaggery Halwa
final texture


Garnish it with some more chopped dry fruits and serve hot.

Jaggery Halwa
Jaggery Halwa


Tips:

Keep stirring continuously to avoid sticking to the pan.

Roasting is must or else the semolina (sooji) would give a raw taste.

Add dry fruits of your choice.

The color of the halwa would vary according to the color of the jaggery.


Do try this food-a-licious for your loved ones and share your experiences with us via comments.

Monday, August 14, 2017

Peda recipe / Instant milk peda recipe / milk peda with milkmaid / milk peda with milk powder with step by step photos and recipe video

 Instant milk peda recipe
Milk peda is a sweet of India, usually prepared in thick, semi-soft pieces. The main ingredients are khoa, sugar and traditional flavorings, including cardamom seeds, dried nuts. Some also add kesar to enhance the flavor and color.

The real peda is so rich and so yummy, you can never stop with one. But the only thing is its very time consuming. And in today’s lifestyle we generally opt for things which can be made instantly. So for those busy people, I am sharing an instant milk peda recipe.

It is made in just 10 minutes and would give almost the same taste. It is very easy to make, but there are some points to consider while making these pedas. The heat should be low or you would end up burning the peda mixture. Also the peda would be a bit chewy or rubbery when hot. Allow it to cool completely and then it would give you the desired taste.


Ingredients: (Makes 15 pedas)

½ tin Milkmaid

1 cup Milk powder (Dairy whitener)

2 tbsp Ghee (clarified butter)

¼ tsp Cardamom powder

Ghee for greasing hands.

Method:

In a pan heat 1 tbsp ghee. 


Let it melt and then add milkmaid followed by milk powder.

Instant milk peda
ghee

Instant milk peda
milkmaid

Instant milk peda
milk powder


Mix it well.

Instant milk peda
mix well


Mash out all the lumps. The mixture should be smooth.

Instant milk peda
mash the lumps


Keep on stirring till the mixture turns thick.

Instant milk peda
mixture becomes thick


Then add 1 tbsp ghee and cardamom powder. Give it a nice mix.
 
Instant milk peda
add ghee, cardamom powder and mix


The mixture by now would start leaving the pan.

Instant milk peda
mixture leaves the pan


Turn off the heat and let it cool slightly.

Instant milk peda
cool slightly


Grease your hands with ghee. 

Instant milk peda
grease your hands


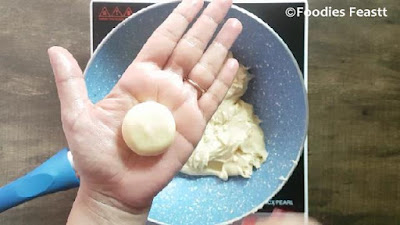
Take a lemon sized portion of the mixture and roll it into a ball and flatten it. 
 
Instant milk peda
roll into a ball and flatten
Place an almond in the center of the peda by pressing it gently.
Instant milk peda
place almond


Milk pedas are ready to serve. Store it in an air tight container.

 Instant milk peda recipe
 Instant milk peda recipe

Tips:

Always keep the heat low to avoid burning of the peda mixture.

Make the pedas when the mixture is hot.

The pedas would be chewy or rubbery when hot, allow them to cool completely and then it would give you the desired taste.

The quantity mentioned would require 10 minutes, time would vary as per the quantity.


Try out these instant and food-a-licious pedas and do share your experience with us via comments.

For more such recipes please subscribe our YOU TUBE channel

Friday, August 11, 2017


Bombay sandwich with step by step recipe and video. This is one of the most admired snack offered on the streets of Mumbai. It is a very quick vegetable sandwich that can be assembled in just few minutes. It goes well with some potato wafers and a cup of masala chai.

Bombay Sandwich / Veg Sandwich / Mumbai Street Side Sandwich


Boil the potatoes with some salt and the same goes for beetroot as well. If you like having raw beetroot skip boiling it. The chutney I have used is the basic green mint chutney.  Sandwich masala is easily available now-a-days, still if you don’t not have one use chat masala. I have sprinkled it only on one layer as it is goes well with my taste, you can do it for both the layers.

Do not apply chutney directly on to the bread, first spread a layer of butter evenly and then apply chutney. Applying chutney directly would make your bread soggy.

For better understanding of the recipe do have a look at the recipe video given below.

If you are looking for more bread recipes then do visit French Toast, Bread Masala, Bread Roll, Sprouts Sandwich and Gold Coin


Ingredients:

3 bread slices

1 tbsp Butter


4 slices Tomato

1 small Onion

½ Cucumber thinly sliced

4 slices Beetroot (boiled)

4 slices Potato (boiled)

1 tsp Sandwich Masala / Chat Masala

Tomato ketchup

Potato Wafers

Method:

Cut the edges of the bread slices

Bombay Sandwich / Veg Sandwich / Mumbai Street Side Sandwich
cut edges


Apply butter evenly on all the slices

Bombay Sandwich / Veg Sandwich / Mumbai Street Side Sandwich
apply butter


Apply chutney on two slices

Bombay Sandwich / Veg Sandwich / Mumbai Street Side Sandwich
apply chutney


Place tomato followed by cucumber and onion rings. 

Bombay Sandwich / Veg Sandwich / Mumbai Street Side Sandwich
place tomatoes

Bombay Sandwich / Veg Sandwich / Mumbai Street Side Sandwich
cucumber

Bombay Sandwich / Veg Sandwich / Mumbai Street Side Sandwich
onion rings

You can also sprinkle some sandwich masala on it.


Cover it with chutney bread slice, chutney facing downwards.

Bombay Sandwich / Veg Sandwich / Mumbai Street Side Sandwich
cover with chutney slice


Now lay beetroot followed by onion rings and potatoes.

Bombay Sandwich / Veg Sandwich / Mumbai Street Side Sandwich
beetroot

Bombay Sandwich / Veg Sandwich / Mumbai Street Side Sandwich
onion rings 
Bombay Sandwich / Veg Sandwich / Mumbai Street Side Sandwich
potatoes


Sprinkle sandwich masala or chat masala on it.

Bombay Sandwich / Veg Sandwich / Mumbai Street Side Sandwich
sprinkle sandwich masala


Cover it with buttered bread slice, butter side facing downwards.

Bombay Sandwich / Veg Sandwich / Mumbai Street Side Sandwich
cover with buttered bread slice


Poke the toothpick to hold the layers in place and cut into 4 pieces.

Bombay Sandwich / Veg Sandwich / Mumbai Street Side Sandwich
poke toothpick

Bombay Sandwich / Veg Sandwich / Mumbai Street Side Sandwich
cut into 4 pieces


Serve it with tomato ketchup, some potato wafers and glass of hot tea.

Bombay Sandwich / Veg Sandwich / Mumbai Street Side Sandwich


Tips:

Cut the veggies into thin slices.

Spread butter before applying chutney.

Chat masala can be used in place of sandwich masala.


DO try this very easy, simple yet delicious Bombay street sandwich now at your home and make your family go food-a-licious.

For more such recipes plz subscribe our youtube channel